Crochet Pattern Guide: Read Any Chart, Symbol and Abbreviation
Decode any chart, symbol or abbreviation before you make your first stitch.
A crochet chart is a picture of your fabric, read from the bottom up and from the center out.
A crochet chart looks like a foreign language until someone tells you the rule: each symbol is one stitch, and the shape of the symbol shows how tall that stitch is. A small cross is a single crochet. A tall cross with two bars is a treble. Once you see that, the chart stops being decoration and starts being a map.
This guide covers both written patterns and symbol charts, the abbreviations that trip people up, and the mistakes that make a project come out the wrong size. Grab a hook and a ball of scrap yarn, because reading is easier when your hands are moving.
Crochet patterns come in two main forms: written instructions with abbreviations, and symbol charts. Learn the six core symbols and about twenty abbreviations, and you can read almost any pattern without guessing.
What you need
Yarn
Worsted weight is easiest to read while learning. One 200-yard ball is enough for practice swatches.
Hook
A 5.0 mm hook matches worsted weight for most beginners. If your gauge runs tight, try 5.5 mm.
Stitch markers
Ten markers is plenty. A scrap of contrasting yarn works just as well.
Printed chart
Print it or keep it on a screen you can zoom. A paper copy lets you mark rows with a pencil.
Written patterns vs symbol charts
Written patterns spell everything out in abbreviations, row by row. They suit blankets, garments and anything with shaping, because words handle 'skip the next stitch' better than a drawing does.
Charts show the same information as symbols arranged in a grid. They shine for lace, doilies and anything worked in the round, where you can see the repeat at a glance instead of counting words in a long line.
If a pattern offers both, read the chart first to understand the shape, then use the written rows to keep your place.
The six symbols you will see most
Every chart is built from a small set of marks. Learn these six and you can read most beginner and intermediate patterns.
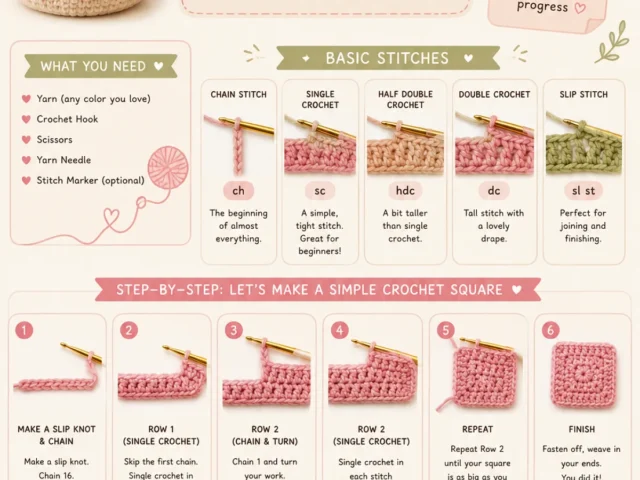
- Chain: a small open oval, often drawn as a tiny circle or a hollow loop.
- Slip stitch: a solid dot, used to join rounds or travel across a stitch.
- Single crochet: a short cross or plus sign, the shortest solid stitch.
- Half double crochet: a cross with one bar across it.
- Double crochet: a cross with two bars, taller than half double.
- Treble crochet: a cross with three bars, the tallest of the common set.
The bars are not decoration. One bar means one extra yarn over, so the stitch grows taller by one step each time.
Abbreviations that appear in almost every pattern
US and UK terms use the same letters for different stitches, which is the single most common reason a project comes out the wrong size. Check the top of the pattern for a note like 'US terms' before you start.
Here is what the letters mean in US terms.
- ch: chain
- sl st: slip stitch
- sc: single crochet
- hdc: half double crochet
- dc: double crochet
- tr: treble crochet
- inc: two stitches worked into the same stitch, which adds one
- dec: two stitches worked together, which removes one
- mr: magic ring, a adjustable loop for starting in the round
- fo: fasten off
- rep: repeat
- sk: skip
- sp: space
- tog: together
- yo: yarn over
UK double crochet is the same as US single crochet. If your swatch looks too tall, you are probably reading UK terms with a US habit.
How to read a chart without losing your place
Start at the bottom. For flat pieces, read right to left on the first row, then left to right on the next, like a zigzag up the page. For rounds, start at the center and spiral outward counterclockwise.
The turning chain at the start of a row is drawn as a stack of ovals. Count it as the first stitch only when the pattern says so. Many modern patterns skip it and use a standing stitch instead.
Lay a ruler under the row you are working. It stops your eye from drifting up to the next row.
Gauge, size and why your project grew
Gauge is the number of stitches and rows in a set square, usually 4 inches or 10 cm. If your gauge is off by one stitch per inch, a 40-inch blanket becomes 44 inches. That is a whole extra panel of yarn.
Make a swatch at least 6 inches square, wash it the way you will wash the finished piece, then measure the middle. Edges lie.
Change hook size, not tension. Going up one hook size usually loosens gauge by about half a stitch per inch.
Mistakes that show up in the first ten rows
The most common error is working into the wrong loop. If you work under both loops, you get a flat, even fabric. Work into the back loop only and you get a ridge. Work into the front loop only and the ridge leans the other way.
The second most common error is losing count at the end of a row. Count your stitches every row for the first five rows. After that, count every fifth row. A stitch marker in the first and last stitch of each row saves you from re-counting.
If your edges slope inward, you are probably skipping the first or last stitch. Count those two stitches out loud until the habit sticks.
Joining rounds and finishing cleanly
For rounds, a slip stitch join leaves a small seam. A continuous spiral leaves no seam but shifts the start of each round by one stitch. Neither is wrong. Pick the one the pattern uses and stay consistent.
Fasten off by cutting a 6-inch tail, pulling it through the last loop, and weaving it back and forth through three or four stitches on the wrong side. Do not knot it. Knots work loose with washing.
Weave ends in two directions, not one. A single-direction weave can pull free after a few washes.
Step
Find the key
Look for a symbol key or legend at the top or bottom of the chart. If there is no key, the pattern is using standard symbols. Check that it says US or UK terms before you read a single stitch.
Make a gauge swatch
Chain 20, work 12 rows in the main stitch, then measure the middle 4 inches. If your count is off by more than one stitch, change hook size and swatch again.
Read one row out loud
Say each symbol as a word before you crochet it. 'Chain two, double crochet, double crochet, skip one.' This catches mistakes before they reach the yarn.
Mark your place
Put a stitch marker in the first and last stitch of the row. When you reach the end, the markers tell you if you gained or lost a stitch.
Check the shape every five rows
Lay the piece flat and look at the edges. Straight edges mean you are on track. Curving edges mean a counting error somewhere in the last few rows.
Ways to change it
Use a chart only
Best for lace and doilies where the repeat is visual. Skip the written rows and work straight from the symbols.
Use written rows only
Best for garments with shaping. Charts get crowded when you add armholes and necklines.
Color-code your chart
Print the chart and shade each repeat in a different color. Helpful for patterns with a 12-stitch repeat.
Swap yarn weight
Going from worsted to sport weight makes the same pattern about 20 percent smaller. Adjust hook size to match.
Work in the round instead of flat
Many flat patterns convert to rounds if you join each row. You lose the turning chain but gain a seamless look.
The short version
- Each symbol equals one stitch, and the bars on the symbol show how many yarn overs it uses.
- US and UK terms use the same letters for different stitches, so check the pattern header first.
- Gauge is measured over 4 inches or 10 cm in the middle of a washed swatch, not at the edge.
- Counting the first and last stitch of every row prevents the most common size error.
- A stitch marker in the first and last stitch saves you from re-counting a whole row.
- Weave ends in two directions so they do not pull free in the wash.
Questions people ask
What does 'ch 2, turn' mean at the start of a row?
It means make two chain stitches, then flip the work so the back faces you. Those two chains act as the first stitch in some patterns and as a simple turning chain in others. Check the pattern note to know which.
Why does my project keep getting wider?
You are probably adding a stitch at the end of each row. The turning chain often gets counted twice. Put a marker in the last true stitch and count only that.
Do I really need to make a gauge swatch?
For blankets and scarves, no. For hats, garments and anything that has to fit, yes. A 6-inch swatch takes about 15 minutes and saves hours of rework.
What is a magic ring and when should I use it?
It is an adjustable loop that lets you pull the center closed tight. Use it for amigurumi, hats and any project worked in the round where a hole in the middle looks wrong.
Pick one chart and read it out loud before you crochet a single stitch.
Reading a crochet pattern is a skill, not a talent. Start with the six core symbols, check whether the pattern uses US or UK terms, and count your first and last stitch every row. Do that and the chart stops looking like code.