Weave In Ends: A No-Fuss Guide to a Neat Finish
Learn to weave in ends so your knitting looks neat on both sides, in about 10 minutes.
That loose end at the edge of your knitting? It’s not a big deal once you know one simple trick.
You’ve finished your scarf, hat, or blanket. Then you see them: the loose yarn ends sticking out like little flags. They’re not just ugly—they can work their way out and ruin your hard work.
The good news? You don’t need a special skill. Just a yarn needle, a few minutes, and a simple back-and-forth motion. Here’s how to do it right, plus what to avoid.
Weaving in ends means hiding the yarn tails on the wrong side of your work with a yarn needle. The goal is a flat, secure finish that won’t unravel, and it usually takes under a minute per end.
What you need
Yarn needle
Blunt tip, big eye. Costs about $3. Use one that’s slightly thicker than your yarn.
Scissors
Any sharp scissors will do, but small embroidery scissors are easier to control.
Your finished knitting
The piece with the loose ends. Make sure it’s off the needles.
What You Need
A yarn needle (also called a tapestry needle) is the only tool you really need. It’s a blunt needle with a big eye, and it costs about $3 at any craft store. If you don’t have one, you can use a crochet hook to pull the yarn through, but a needle is easier.
You’ll also want scissors to trim the tail after weaving. That’s it.
Use a needle with a blunt tip—it won’t split your yarn.
The Basic Weave
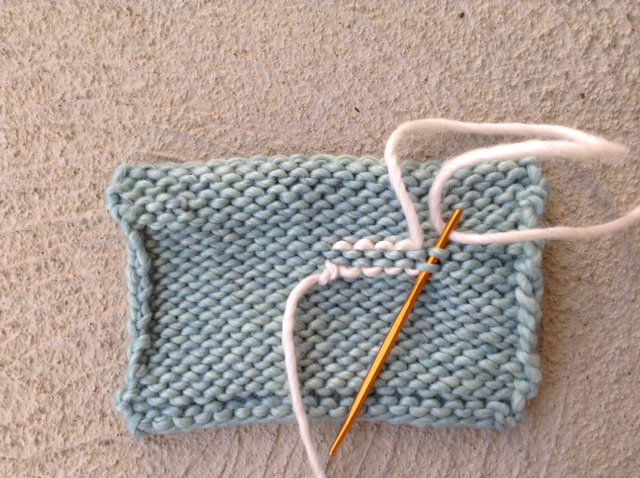
Thread the tail onto the needle. Then work the needle through the bumps (the purl bumps) on the wrong side of your knitting, following the path of the yarn. Go back and forth in a zigzag for about 2 inches (5 cm).
You want to catch the yarn in the stitches so it’s held snugly. Pull gently—if you pull too tight, the fabric puckers; too loose, and the end may peek out.
When you’ve woven about 2 inches, trim the tail close to the fabric, but not so close that you risk cutting a stitch.
Weave in the same direction as the yarn’s twist. It helps the end stay hidden.
Weaving on Garter Stitch
Garter stitch has ridges on both sides, so you can weave on either side. Use the same zigzag path through the bumps, but work on the wrong side if there is one.
If your piece is reversible, like a scarf, weave the end into a seam or edge where it’s least visible. On garter, you can also duplicate-stitch over the ridge—it’s invisible.
For garter, weave diagonally across the ridges to distribute the bulk.
Weaving on Stockinette Stitch
Stockinette has a smooth V side and a bumpy wrong side. Always weave on the wrong side, through the purl bumps. That way, the right side stays clean.
Follow the line of the yarn—if the tail is from a row of knit stitches, weave horizontally through the bumps of that row. This makes the weave almost invisible.
If your yarn is slippery, weave a bit longer—3 inches (7.5 cm)—to be safe.
What Goes Wrong and How to Fix It
If your weave is too tight, the fabric will gather. Fix it by gently pulling the fabric to stretch it back, and re-weave with a looser hand.
If the end shows on the right side, you’re weaving through the front loops. Switch to the back loops or the purl bumps.
If the end slips out after wearing, you didn’t weave enough. Go back to at least 2 inches, and make sure you catch the yarn in the stitches, not just through the fabric.
Always weave in ends before blocking. Blocking sets the weave and hides it better.
Make It Your Own
Step
Thread the needle
Slide the yarn tail through the eye of the needle. If it’s frayed, wet the tip or use a needle threader.
Choose the wrong side
Turn your work so the back (the side that won’t show) faces you. On stockinette, that’s the bumpy side.
Weave in a zigzag
Insert the needle through the purl bumps, going in and out along a row. Go about 2 inches (5 cm), then reverse direction and weave back, so the yarn is secured.
Trim the tail
Cut the yarn close to the fabric, but leave a tiny bit so you don’t snip a stitch. Gently stretch the fabric to let the end sink in.
Ways to change it
Duplicate stitch
For a truly invisible weave, follow the shape of the knit stitches on the wrong side. Great for garter and stockinette.
Russian join
If you’re joining a new ball, use this method to avoid tails altogether. It’s a bit fiddly but works for most yarns.
Crochet hook method
If you don’t have a needle, use a crochet hook to pull the tail through the stitches. Works in a pinch.
Wet blocking
After weaving, wet block your piece to flatten the weave and hide any bumps. Especially good for lace.
The short version
- Always weave on the wrong side of your work.
- Weave at least 2 inches (5 cm) to secure the end.
- Use a blunt yarn needle to avoid splitting the yarn.
- Pull gently to avoid puckering.
- Weave in ends before blocking for a neater finish.
- Trim close, but not too close, to the fabric.
Questions people ask
How long should the yarn tail be before weaving?
Leave at least 4 to 6 inches (10-15 cm) from your last stitch. That gives you enough to thread and weave comfortably.
Can I weave in ends with a crochet hook?
Yes, you can. Use a hook to pull the tail through the purl bumps in a zigzag, but a needle is easier and less likely to split the yarn.
Why does my weave show on the right side?
You’re probably weaving through the front loops or on the right side. Turn your work so the wrong side is facing you and weave through the purl bumps.
Now go weave in those ends and enjoy your finished piece
Weaving in ends is a small step that makes a big difference. With a little practice, you’ll do it without thinking. Keep it quick and cute!