Blocking Crochet: The Easiest Way to Make Your Projects Look Professional
You'll learn to block any crochet piece in about twenty minutes, using items you already have at home.
Your granny squares are wonky, and that's not your fault—it's just missing one step.
You've finished a project, and it looks… okay. The edges curl, the stitches are uneven, and the shape is all wrong. Before you blame your hook, try blocking. It's the step that turns handmade into hand-finished.
Blocking is not hard. It's water, pins, and patience. You can do it with things you already own—no fancy equipment needed.
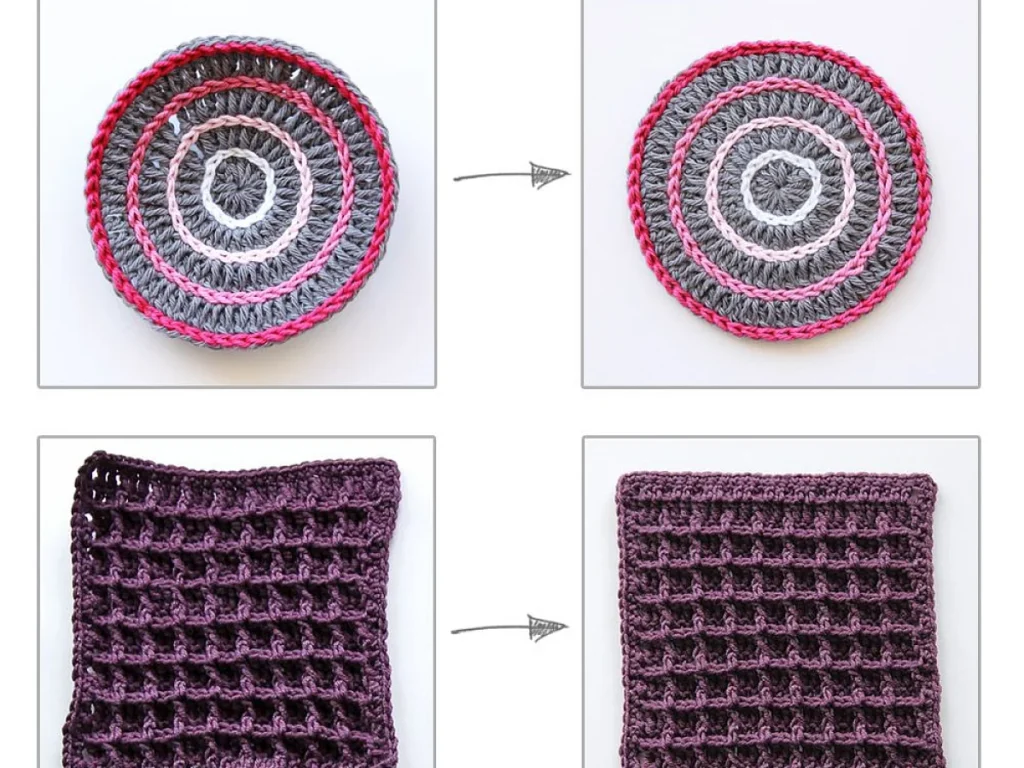
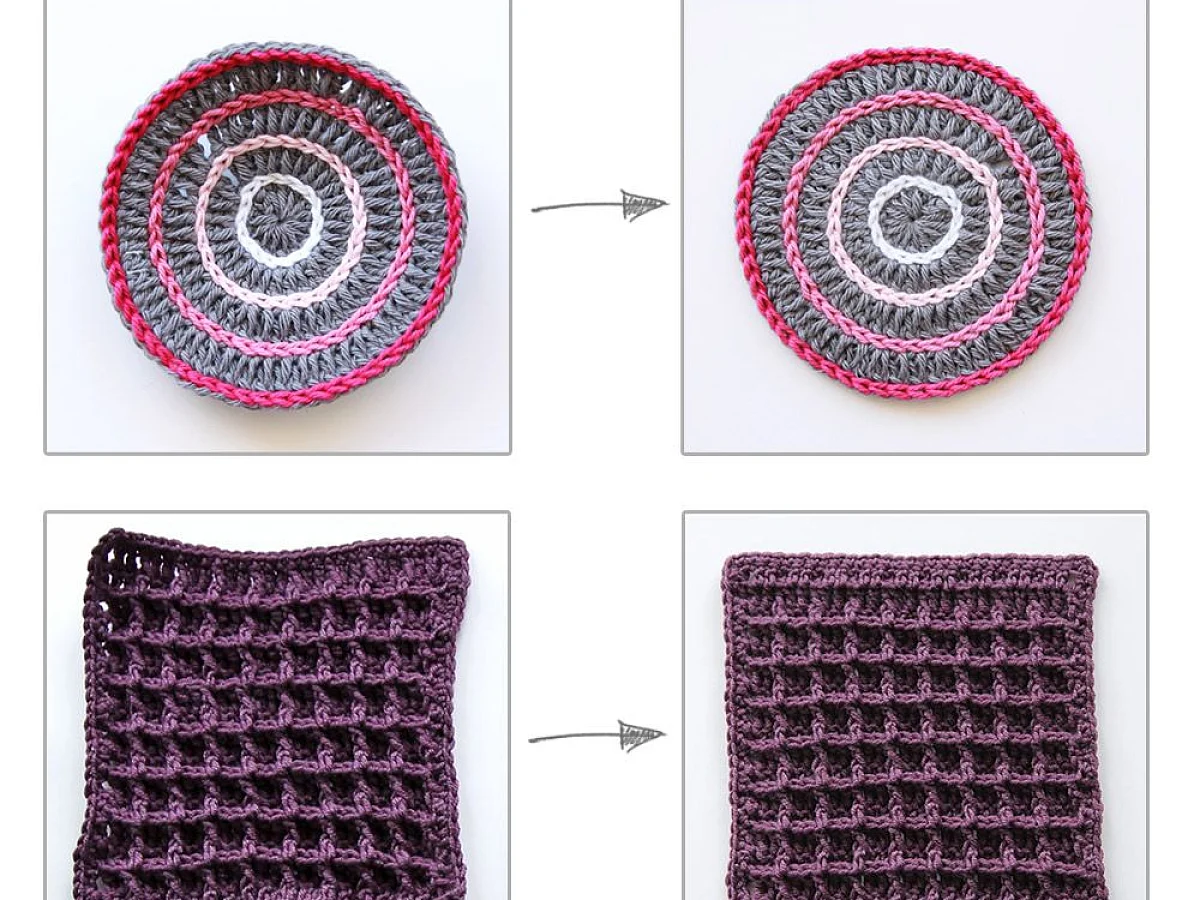
Blocking is the secret to making your crochet look neat and professional. It's simply wetting or steaming your finished piece, then pinning it into shape and letting it dry. It takes about twenty minutes of hands-on time, and it fixes curling edges, uneven stitches, and misshapen motifs.
What you need
Clean towel
To absorb water and protect your surface. A large bath towel works.
Rust-proof pins
T-pins are ideal because they hold well and won't leave marks. A pack costs about five dollars.
Flat surface
A table or floor works. Foam play mats are perfect because you can stick pins in them.
Lukewarm water and mild soap
Use a drop of mild detergent or wool wash. No need for special blocking soap.
Steam iron or steamer
Only if you're blocking acrylic. A regular iron with a steam setting works.
What is blocking and why does it matter?
Blocking is gently shaping your finished crochet while it's wet or warm, then letting it dry in that shape. It relaxes the yarn and sets the stitches, so your work lies flat and even.
It matters for almost every project. Lace needs it to open up. Garments need it to fit. Granny squares need it to match. Even a simple scarf looks better after a quick steam.
The one exception: acrylic yarn. Wet blocking doesn't hold on acrylic. You'll need heat from a steam iron or steamer instead.
If your yarn label has washing instructions, follow those. Most yarns can handle gentle hand washing.
What you need to start blocking
You don't need a blocking board. A clean towel, some rust-proof pins, and a flat surface work fine. A foam play mat or yoga mat is great if you have one.
For wet blocking, you'll need lukewarm water and a mild soap or wool wash. For steam blocking, a steam iron or garment steamer does the job.
- Clean towel
- Rust-proof pins (T-pins are best)
- Flat surface (or foam mats)
- Lukewarm water and mild soap
- Steam iron or steamer (for acrylic)
Step-by-step: wet blocking for natural fibers
Wet blocking works for wool, cotton, alpaca, and blends. It's the most common method.
Soak your piece in lukewarm water with a drop of soap for about fifteen minutes. Don't agitate—just let it sit.
Gently squeeze out the water. Never wring or twist. Roll it in a towel and press to remove extra moisture.
Lay it flat on your blocking surface. Pin the edges to the measurements you want. Let it dry completely, usually overnight.
Measure the piece before you pin. You want it to look like the pattern's finished dimensions, not stretched beyond.
Step-by-step: steam blocking for acrylic
Acrylic yarn melts under direct heat, so you need steam, not a hot iron on the fabric.
Pin your dry piece into shape on a blocking board or towel.
Hold a steam iron or steamer about an inch above the surface. Steam the whole piece, but don't let the iron touch the yarn.
Let it cool and dry completely. The heat sets the shape.
Test a small swatch first to be sure your yarn doesn't melt or flatten.
How to pin tricky shapes
For squares and rectangles, pin the corners first, then the edges. For circles, pin in quarters, then fill in between.
For lace, pin each point and picot. That's what opens up the pattern.
For garments, pin the seams and edges to the measurements on the pattern. Use a measuring tape to check.
If you don't have blocking wires, use long, straight pins and a ruler to keep lines straight.
Common mistakes and how to fix them
The biggest mistake is stretching too much. If you pull a piece beyond its natural size, it won't bounce back. Pin gently.
Another is not letting it dry fully. Even slightly damp yarn will lose its shape. Wait the full time, even if it feels dry on top.
And don't skip the pinning. Just laying it flat doesn't count as blocking.
If your piece is still wonky after blocking, you can re-wet it and try again. It's not permanent.
Ways to make blocking your own
You can block a piece in different shapes. A scarf can be blocked straight, or with wavy edges if you pin it that way.
For a more structured look, use a blocking mat with grid lines. It helps you keep things square.
For a softer finish, skip the pins and just lay the piece flat to dry. That's called 'relaxing' and works for garments that don't need exact shaping.
Step
Soak your piece
Fill a basin with lukewarm water and a drop of soap. Submerge your crochet and let it sit for 15 minutes.
Remove excess water
Gently squeeze, then roll in a towel and press. Don't wring or twist.
Pin into shape
Lay flat on a towel or foam mat. Pin edges and corners to the desired measurements.
Let it dry completely
Wait until it's fully dry, usually overnight. Don't rush this step.
Unpin and enjoy
Remove pins and your piece should hold its shape. If not, repeat the process.
Ways to change it
Spray blocking
For delicate pieces, spray with water and pin. Lighter than full soaking.
No-pin blocking
Just lay flat to dry for a soft, natural shape. Good for blankets and scarves.
Blocking wires
For large lace shawls, wires along the edges give crisp points.
Blocking mats
Interlocking foam mats with grids. Easier to pin and measure.
The short version
- Blocking fixes curling, uneven stitches, and wrong shapes.
- Wet blocking works for natural fibers; steam for acrylic.
- Never wring or twist your piece.
- Pin gently—stretching too much ruins the piece.
- Let it dry completely, usually overnight.
- You can re-block if the first try doesn't work.
- You don't need special equipment to start.
Questions people ask
Can I block acrylic yarn?
Yes, but wet blocking won't hold. Use steam from an iron or steamer, holding it above the fabric. Test a small swatch first.
How long does blocking take?
About 20 minutes of active time, plus drying time. Most pieces dry overnight, but thicker items may take longer.
Do I have to block every crochet project?
No, but it helps with most things. Garments, lace, and motifs benefit a lot. A simple scarf can be left alone if you like the texture.
What if I don't have blocking pins?
Use any rust-proof pins you have. You can also use a heavy object, like a book, to hold edges down, but pins work best.
Now go block something you've made
Blocking is a simple step that makes a big difference. Try it on your next project, even a small swatch. You'll see the stitches settle and the edges straighten. It's worth the twenty minutes. Keep it quick and cute!